Varian variable leak valve adjustment procedure

Print Friendly, PDF & Email

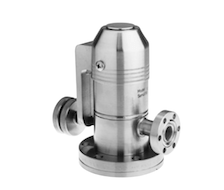
This post is about how to adjust the 951-5100 and 951-5106 Varian variable leak valve commonly found on vacuum chambers across the globe.  Invented in 1968 by William Wheeler and Paul Hait, the patent was assigned to Varian Associates; many thousands of these valves have been built since then. In 2010, Varian was purchased by Agilent Technologies and since that time it has been harder to find the rebuilt kits for these variable leak valves. The order information for the rebuild kit can be found at the bottom of this post, as well as a link to the instruction manual.

Varian variable leak valve

Varian variable leak valve

Overview-

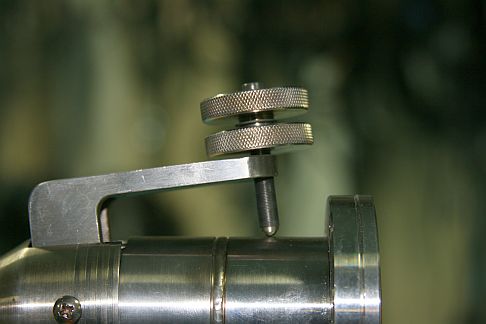
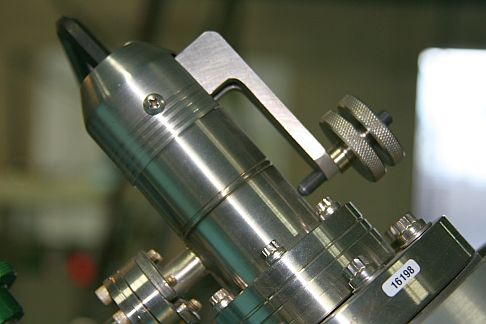
When this type of variable leak valve does not close all the way, operators will usually unlock the two knurled knobs and move them up the fine drive screw assembly and then re-lock them.  What that does is to allow the handle to move out further from the valve body and put more pressure on the sapphire, which effectively closes the valve.  That works fine for periodic adjustments to close the valve. However, if the handle is far away from the valve body it is possible to get too much leverage and crack the sapphire (which causes catastrophic valve failure) and also reduces the range of the valve arm. The picture below shows a valve handle that is too far away from the valve body and needs to be reset.

misadjusted varian leak valve

Adjustment procedure –

When properly adjusted, the handle will be parallel to the valve body when closed. Gas should just start to leak into the vacuum chamber when the knob is turned CCW by 2 full turns.  The following procedure is an abbreviated version that I use which works most of the time. For a more thorough explanation of this adjustment refer to the manual.

CAUTION!   Read and understand the procedure and notes before you attempt the adjustment on your system.  You need to know exactly how much gas pressure you are putting into the valve, how much you need to adjust the valve by and the status of your vacuum chamber.  The roughing screw is very sensitive; a very small amount of adjustment can be the difference between success and a dumped system!

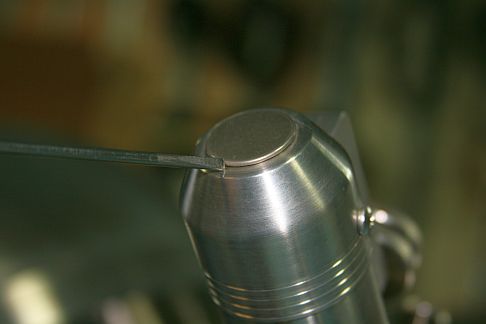
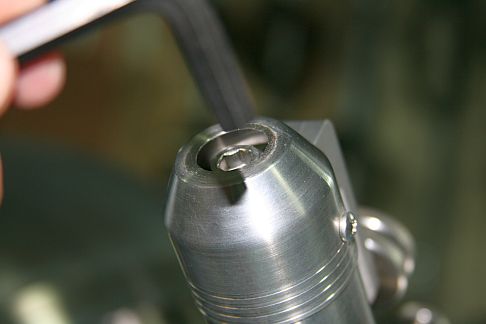
1. Use a small straight blade screwdriver to remove the hole cover on the back end of the leak valve to expose the roughing screw cap hex head.
use screwdriver to remove valve endcap

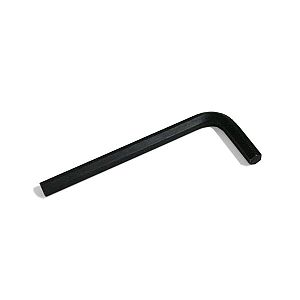
2. Insert a 5/16” Allen wrench into the cap head of the roughing screw

allen wrench 5-16

use hex head allen wrench to adjust roughing screw

3. Monitor the vacuum in the chamber. For most PHI surface analysis systems the vacuum should be in the low 10-9 Torr or lower.
4. If necessary, adjust the handle so that it is parallel to the valve body. The knobs will need to be adjusted – turn the top knob CCW while holding the bottom knob in place. That will separate the two knobs and then you can spin them one at a time into position. Lock them on the fine drive screw assembly by holding the bottom knob in place and turning the top knob CW until it firmly butts up against the bottom knob.  There is a spring washer between the two knobs that helps to lock them together.  Once set, always turn both knobs together when opening (turn CCW) or closing (turn CW) the valve.

adjust handle so that it is parallel to body assembly

NOTE: Keep an eye on the vacuum in the chamber as you SLOWLY adjust the handle. If the pressure starts to increase, turn the Allen wrench CW by a few degrees to close the valve. The roughing screw is coarse threaded and so a very small movement on the Allen wrench has a large effect on the valve, whether closing (CW) or opening (CCW). The maximum torque that should be applied to the roughing screw is 6 foot lbs.

5. Once the handle has been set so that it is parallel to the valve body and the valve is closed (no gas leaking into the chamber) you are ready to adjust the open position of the valve.
6. SLOWLY turn the knob (both knobs turn together) CCW while observing the vacuum in the chamber. You want to get to two full turns without bleeding any gas into the chamber. If you start to see leakage before two full turns on the valve, compensate by turning the Allen wrench CW slightly until the leakage stops and the vacuum starts to recover.
7. Once you have the valve open two full turns with no leakage, SLOWLY turn the Allen wrench CCW in increment of 1 to 2 degrees at a time until the gas just starts to leak into the vacuum chamber.  Then close the leak valve by turning the knob fully CW (two turns).
8. Verify that the gas just starts to leak into the vacuum chamber at about 2 turns. If necessary, adjust the Allen wrench in very small increments.  Sometimes it is not possible to have the valve open at two turns.  It may not open until as many as 6 turns, and that is still acceptable. The idea is to have predictable, smooth and repeatable control.
9. When you close the valve, go just finger tight – do not over tighten the knob or you will damage the threads on the fine drive screw! The fine drive screw should be periodically lubricated, I prefer C5A over moly-disulfide.

NOTE:  If you are adjusting the leak valve after connecting a pressurized gas bottle for the first time, have the Allen wrench inserted into the roughing screw so that you can quickly close the valve further if the pressure in the chamber rises.  Sometimes a valve will seal fine in atmosphere but leak when up to 500 PSI is applied to the back end of the valve. The valve is rated for a maximum of 500 PSI inlet gas pressure, but it will work better with 100 PSI or less.

If this procedure does not work, then the valve may need to be cleaned or the sapphire and gasket assemblies replaced. There is a limited lifetime on the gasket assembly as the copper gasket becomes compressed with each use.  The manual specifies anywhere from 20 to 300 valve closures based on whether or not the valve is baked out or not. However, on the surface analysis systems where I have seen these valves used, they can operate for many years with little or no adjustment.

Refer to the manual for cleaning and rebuild instructions as well as a more detailed adjustment procedure.

adobe_pdf Varian variable leak valve manual

Agilent (Varian) variable leak valve part numbers (refer to drawing below) and prices as of February 2013:

9620014 $546.00 Repair and tool kit includes all of the parts and tools that are required in order to completely rebuild the valve as well as instructions
9535050 $322.00 Replacement gasket assembly
9530072 $398.00 Replacement sapphire assembly
9515106 $1,372.00 The entire valve – Sapphire-sealed variable leak valve and valve adjustment toolsWith NW16 CFF gas inlet

Valve repair kit parts list_001

TO PLACE AN ORDER, Agilent offers several options:

1)      Visit http://www.chem.agilent.com/store/StoreSearchResults.aspx?sp=9620014  to place online orders using a purchase order or credit card.

2)   Call 1-800-882-7426 (option 1) any weekday between 8 am and 7 pm Eastern time in the U.S., and Canada.

3)   To place an order by telefax: 1-781-860-5405

4)   To place an order by email: vpl-purchaseorders@agilent.com

5)   Or you can mail your order to:

Agilent Technologies, Inc

121 Hartwell Avenue
Lexington

MA 02421 USA

To place an order, the following information is required: Purchase order number or credit card, delivery date, ship to, invoice to, end user, and quote number. GSA customers please provide GSA contract #.

TO CHECK THE STATUS OF AN ORDER:

1)      Visit http://www.chem.agilent.com/en-US/Products/Instruments/vacuum/Pages/default.aspx to check the status of your order.

2)      Call 1-800-882-7426 (option 1) any weekday between 8 am and 7 pm Eastern time, in the U.S., and Canada. You will need to know the purchase order or credit card number the order was placed on.

PHI Optics Repair Guidelines

Print Friendly, PDF & Email

This document contains information about optics repair methods, procedures and tricks that are useful when working on older PHI optics units such as cylindrical mirror analyzers, x-ray photoelectron spectrometers and sputter ion sources.

General Optics Guidelines.

  1. Clean all tools with isopropanol or methanol and also degauss them if possible. Most customers have degaussing coils which came with their system. If not, RBD can provide them.
  2. Always use gloves when working with optics.  This is to keep oils from your fingers from contaminating the optics.
  3. Maximize space between all high voltage wires and ground to prevent arcing.
  4. Avoid sharp points on all connections to prevent arcing.
  5. When ever possible, cover all high voltage wires with ceramic tubing, ceramic beads or Teflon tubing. If you can’t do that, then make sure all HV wires have gentle bends and no sharp bends.  Sharp bends, just like sharp points, can increase the chance of arcing.
  6. Tighten all screws securely, especially if the unit needs to be shipped after a repair.  Vibration from shipping can cause optics to loosen up and become damaged.
  7. Degauss the analyzer several times during the re-assembly process, especially when the magnetic shields go back on.

Analyzers.

Single pass CMA (cylindrical mirror analyzer).

The PHI single pass CMA is the most common type of Auger (AES) analyzer in the surface analysis industry. It is a very simple and mostly reliable device.  Double Pass CMAs are essentially two single pass CMAs stacked on top of each other to increase energy resolution which allows for the acquisition of X-ray Photoelectron spectroscopy (XPS, or ESCA) data.

To maintain optimum performance, analyzers need to be cleaned periodically.  Depending on usage, vacuum conditions and amount of sputtering, this could be anywhere from 2 years to 20 years.  Expendable items such as filaments, electron multipliers and grids need to be changed on more regular basis.

PHI CMAs that RBD services:

Model Number Description Specifications Filament type Multiplier type
10-150 TFA 100 uM beam size C75010RP 4839RE
10-155 TFA 100 uM beam size C75010RP 4839RE
15-110 Scanning 5uM beam size C75010RP 4731GRE
15-110A Scanning 3uM beam size C75010RP 4731GRE
15-110B Scanning 1uM beam size C75010RP 4731GRE
15-255G Double pass CMA 100uM beam size C75010RP 4731GRE
25-110 Scanning 2000Ǻ beam size LAB6590RE 4831GRE
25-120 Scanning 500Ǻ beam size LAB6595RE 4831GRE
25-120A Scanning 350Ǻ beam size LAB6600RE 4831GRE
25-250 Double pass CMA 100uM beam size C75010RP 4731GRE
25-260 Double pass CMA with Scanning 1uM beam size C75010RP 4731GRE
25-270 Double pass CMA with Scanning <1uM beam size C75010RP 4731GRE

CMA analyzers have many things in common. For example, all CMAs have:

  • Inner cylinders with grids
  • Outer cylinders
  • Conical and flat terminating ceramics
  • Electron guns
  • Ceramic feed-throughs
  • High voltage insulating ceramics
  • Copper and tantalum wire
  • Coupling connectors
  • Set screws
  • Magnetic shields

General Analyzer Tips

Be very careful when removing and replacing the conical ceramic as it can chip and break easily. Replacements cost is $2K to $4K.

When replacing the conical ceramic, rotate it slightly. If the conical ceramic appears to be loose remove it and place some copper shims on the lip if the inner cylinder to ensure a solid electrical contact. If the conical ceramic does not make a good electrical contact, the background counts in the data will increase dramatically above 800 eV or so, resulting is poor data.

Ensure that all electron gun ceramics and lenses seat properly before tightening. This ensures that the electron gun will be co-axial with the center of the CMA.  If the electron gun is not centered, it will be off-axis resulting in a poor elastic peak shape and low Auger signal.

Use tantalum wire for deflection leads.  It is more flexible than copper and will last longer before it breaks.

Use .020″ copper wire or thicker for filament leads.  .015″ wire will not provide sufficient current to the filament and you will not be able to get any emission from the filament.

Measure the resistive of the flat terminating ceramic and conical ceramic before you re-assemble the analyzer.  Note the values so that you can determine if they are making proper electrical connection after the conical ceramic is replaced. Example: The flat ceramic is 4 M ohms and the conical ceramic is 1 M ohms.  If the conical is not making contact, the resistance from the outer cylinder to ground will be 4 M ohms.  If only the conical ceramic is making contact but the flat is not, the resistance from the outer cylinder to ground will be 1 M ohms.   If they both are making good electrical contact, the resistance will be 750KW.

The outer cylinder is called VM (for voltage modulation) on most CMA analyzers.  On double pass CMAs such as the 15-255G and 25-260/270, it is called OC (for outer cylinder).

VM and OC resistance checks.

Model Number Resistance check
10-150 VM to ground = 3 to 3.2 M ohms
10-155 VM to ground = 3 to 3.2 M ohms
15-110 VM to ground = .6 to .8 M ohms
15-110A VM to ground = .6 to .8 M ohms
15-110B VM to ground = .6 to .8 M ohms
15-255G IC to OC = .6 to .8 M ohms       IC and OC to ground = open
25-110 VM to ground = 3 M ohms
25-120 VM to ground = 3 M ohms
25-120A VM to ground = 3 M ohms
25-250, 25-260, 25-270 IC to OC = .6 to .8 M ohmsIC and OC to ground = open GR to ground = open

Tip: If measuring on a system, make sure that the electron gun is off or the electrons coming into the front of the analyzer will give you a false reading.

10-155 electron gun detail

590 Filament Replacement Procedure

  1. Remove the magnetic shield (4 screws).
  2. Carefully remove the conical ceramic ring (4 flat head screws) and remove the conical ceramic.
  3. Remove the outer cylinder (1 screw), careful not to force it. If necessary, use a heat gun to loosen it up.
  4. Separate all of the wires in the bottom of the analyzer using 2 needle nose pliers or tweezers.  Be careful not to stress the wires.  Position the wires so that you can easily remember where the go back.  In the case of the F1 and F2 wires, this is easy. For the DEFL/STIG wires, position the wires as upper right and upper left, lower right and lower left.
  5. Loosen the 4 spline set screws on the top of the inner cylinder by 1 turn CCW.
  6. Remove all but one of the eight screws around the middle of the inner cylinder.
  7. Remove the upper inner cylinder grid cap (4 screws).
  8. Holding on to the nose of the electron gun, remove the final screw at the middle of the inner cylinder.
  9. Carefully pull the electron gun up and out of the inner cylinder.  Be careful not to stress any of the wire connectors.
  10. Place the electron gun on a sheet of aluminum foil.
  11. Loosen the bottom cap of the electron gun (4 screws and 4 set screws)
  12. Carefully slide the bottom cap down the ceramics for about 2”, enough room to get at the filament.
  13. Remove the filament assembly (4 cap screws, 2 splines connecting the filament wires).
  14. Install the new filament assembly, and reverse all of the above steps.

General tips:

Clean and demagnetize all of your tools.

Place all removed parts on a clean work area covered with Aluminum foil.

If possible, dust off all parts with nitrogen as you re-assemble them.

Never force any part that doesn’t want to go.

You can use methanol as a lubricate if screws don’t move easily.

 15-110 Analyzer Burn-In Procedure (also for the 560 AND 570 ESCA analyzers)

  1. First, bake system after installation.  If that is not possible, bake out just the analyzer using heat tape.   200 degrees Celsius for 6 to 8 hours.
  2. Allow the analyzer to cool down.
  3. Set the beam voltage to 500 volts and the emission know fully CW. Slowly turn up the filament current on the 11-045 until you have  .1 to .2 mA of emission current (about 6 to seven turns on the filament knob).
  4. Very slowly,  (over a period of 1 to 2 hours) bring the filament up to 2mA of emission current.
  5. Next, slowly bring the beam voltage up to 2kV (about 30 minutes from 500 volts).
  6. Set the condenser on the 11-045 to maximum and do an elastic peak alignment.
  7. Slowly increase the multiplier voltage until a peak is just visible.
  8. Leave the multiplier voltage at this setting for 6 hours or more.
  9. After the multiplier burn-in procedure is complete, slowly increase the beam voltage to the normal setting.

Note:  The higher you operate the beam voltage, the slower you need to out gas it.  Typically, you can go from 2kV to 5kV in 2 or 3 hours. 5kV to 8kV takes an additional 4 to 6 hours. Once conditioned, you can go up to that beam voltage quickly.

15-255G Filament Change Procedure

Use gloves, de-magnetize all tools and clean all tools with Isopropanol.

  1. Set analyzer on stand or use manuals and support analyzer on handles, facing up.
  2. Remove outer magnetic shield (4 screws)
  3. Remove inner magnetic shield (4 screws)
  4. Carefully remove conical ceramic
  5. Lift upper outer cylinder up and set aside on clean aluminum foil.
  6. Carefully lift inner cylinder up and off of the electron gun assembly. Note: If the inner cylinder does not move freely, use a heat gun to expand the inner cylinder so that it will slide off. Do not force it! Be careful not to damage the grids.
  7. Look at the 10-155 electron gun detail to familiarize yourself with the electron gun assembly.  The 15-255G has basically the same electron gun as in the 10-155.
  8. Remove the three long screws that hold the electron gun assembly together.
  9. Remove the V1 emission screw
  10. Remove the 2 filament couplers from the filament posts. You will need a .048 4 spline wrench.
  11. Remove the 3 filament ceramics.
  12.  Remove the filament assembly. Note the orientation of the emission tab and filament posts.
  13. Remove the 3 screws that hold the filament base on and remove the filament.
  14. Install the new filament in the same orientation as the old filament into the emission cap.
  15. Install the 3 screws and the filament base and tighten slightly.
  16. Position the filament so that it is centered in the hole and tighten the 3 screws. This is best done using a microscope.
  17. Install the filament assembly on top of the 3 filament ceramics and use the 3 long screws to hold the assembly together. The three long screws need to be tightened firmly so that they all have the same distance with respect to the base.
  18. Reconnect the V1 wire
  19. Reconnect the filament couplers.
  20. Ohm out the connections to the filament and V1.
  21. Degauss the gun assembly.
  22. Install the inner cylinder over the electron gun assembly.
  23. Reinstall the upper outer cylinder.
  24. Carefully install the conical ceramic. The resistor part should be 180 degrees out from the center flat ceramic. Ohm out VM to ground and make sure it has the correct resistance. See the Conical Ceramic PDF file for more information.
  25. Install the inner magnetic shield
  26. Degauss the analyzer.
  27. Install the outer magnetic shield.
  28. Degauss the analyzer. Installation complete.

 SCA (Spherical Capacitive Analyzer)

The PHI model 10-360 SCA analyzer is uses a different approach than the CMA which results in a higher transmission (better collection of signal).   Since there are no grids in the SCA, the only maintenance normally required is the replacement of the electron multiplier.

There are three types of detectors used in the SCA. They are, single channel multiplier, PSD (position sensitive detector) and MCD (multi channel detector).

10-360 Detector and multiplier cross reference:

System Model Description Specifications Detector Type Multiplier type

5100

Large Area 2 X 10mm Single channel Channeltron

5300

Large Area 2 X 4mm Single channel Channeltron

5400

Small Spot 200uM PSD Channel plates

5500

XPS/AES 75uM MCD Chevron

5600

XPS/Scanning AES 30uM MCD Chevron

x-ray photoelectron spectrometer


Ion Guns.

Hot Filament type

The most common type of ion gun is the hot filament type.  A filament is heated up white hot and electrons are accelerated into the ionizer grid assembly. Argon gas is either injected or back-filled into the ionizer grid where electron impact converts the Argon atoms into Argon ions which are then accelerated towards the target.

Hot Filament Ion Guns have many things in common including:

  • Filaments
  • Ionizer grid assembly
  • Extractor assembly
  • Condenser and Focus lenses
  • Insulating ceramics
  • Deflection plates
  • Ceramic feedthroughs
  • High voltage insulating ceramics
  • Copper and tantalum wire
  • Coupling connectors
  • Set screws

PHI Ion Guns that RBD services:

Model Number Description Specifications Filament type
04-161 2kV Backfill 2mm beam size Dual tungsten
04-162 2kV Backfill 2mm beam size Dual tungsten
04-191 5kV Backfill 1mm beam size Dual tungsten
04-192 5kV Backfill 1mm beam size Dual tungsten
04-300 4kV Backfill 1mm beam size Tungsten
04-303 5kV Backfill 200uM beam size Tungsten
06-660 Duoplasmatron 5uM beam size Anode/Cathode
06-670 Cesium 5 uM beam size Frit assembly

04-161 sputter ion gun schematic

Titanium sublimation pump operation

Print Friendly, PDF & Email

The TSP (titanium sublimation pump) is used in conjunction with an ion pump to improve pumping efficiency.  It works by evaporating a titanium film onto the cryopanel or TSP shield. The titanium film is very reactive and so the gas molecules in the chamber that collide with the cryopanel wall will react with the titanium and stick. The titanium film also helps to replenish the ion pump elements.

On Physical Electronics surface analysis instruments such as X-ray photoelectron and Auger spectrometers, there are 4 filaments on the titanium sublimation pump flange. Since the lifetime of each filament is limited, having 4 filaments extends the time before needing to vent and replace the filaments.

When using a Boostivac or TSP control, I always recommend that you use the Cycle mode. The reason is that if you happen to get distracted while operating the TSP in the Continuous mode you may forget to turn the control off and could put much more titanium into the system than you planned on, and also burn up the filament.

To operate the TSP:

  1. Set to Mode switch to Cycle
  2. Press the Reset button (located under the Cycle Length Minutes knob).
  3. Turn up the filament current to just above 50 amps.  Note that the filament current will drop as the filament warms up. You want it to be at 50 amps after it warms up.
  4. Observe the chamber vacuum on the ion gauge control. The pressure in the chamber will come up as the filament heats up initially. Then, the pressure will drop as the TSP filament sublimates.
  5. After about 2 minutes the pressure will stop falling and start to rise again. At that point, turn the TSP control to OFF.  In the cycle mode, the filament will automatically shut off after about 2 minutes. But if left in the cycle mode it will turn on again once every 30 to 45 minutes (depending on what the cycle length time is set to).  It is better to turn the TSPs off when not in use in order to extend the filament lifetime.

Titanium sublimation pump


Common Questions

How often should I operate the TSP?

In general, unless you are pumping a high gas load you only need to use the titanium sublimation pump occasionally.  Many people will use them just once a week, on Friday afternoon so that the system can recover over the weekend for example.  If you are using them to help pump the chamber back down after being up to air, then they are used once every hour or so for the first few hours of the pump down process.  They should also be used after a bake out.

What vacuum do I need to be at before I use the TSPs?

You can use them starting in the mid 10-4 Torr range. In fact, they are very helpful at this vacuum level in helping start the ion pumps (which need to be in the low 10-5 or better vacuum to start). Typically the TSPs are operated after loading gassy samples to help the vacuum recover more quickly from the 10-8 Torr into the 10-9 Torr range.

How long do the TSP filaments last?

That depends on how often you use them, but on most vacuum chambers they will last for a year or more before all 4 filaments are burnt up. They should be replaced as part of any preventive maintenance program. Note that the filaments may not actually burn out before the titanium becomes depleted.  As the filaments are used up the maximum current that they will come up to is reduced. When they can no longer be driven up past 45 amps they are no longer effective and should be replaced.

Should I use the TSP filaments one at a time or rotate them?

My preference is to use them one at a time until that filament is shot and then move onto the next one. The exception is that I outgas all 4 filaments into the turbo pump for 2 to 3 cycles anytime that new filaments have been installed. Out-gassing the new TSP filaments into the turbo pump will significantly reduce the outgas load on the ion pumps.  Each time you vent the chamber you need to outgas the filaments into the turbo pump as part of the pump down procedure.

How to replace the filaments:

Replacing the filaments is very simple; there are only 2 things that you need to know:

  1. Make sure that the filaments face out from the center post on the TSP assembly. The reason is that the filaments should warp out of position away from the filament shaft. If you face them towards the shaft then the filaments will short out and melt when they warp. See the pictures below.
  2. Use pliers to hold the copper coupler when tightening the filament to the shaft to prevent the shaft from bending. You need to tighten the couple quite a bit to make sure that the filament does not loosen up as the filament heats up. Note that the copper couplers get soft from use and so you may need to replace them when you change the filaments.  If the coupler strips out it needs to be replaced.

TSP Filament orientation


Warped TSP filament

Warped TSP filament


RBD Instruments provides replacement titanium sublimation pump filaments, TSP flange assemblies and offers repair services for the Boostivac and TSP controllers.